Boost Your Revenue: How to Set Up WooCommerce Tiered Pricing for Events
Not all seats at your event are created equal. The front-row table at a gala, the center orchestra seats at a play, or the early-bird tickets for a conference all have different values. Implementing a WooCommerce tiered pricing strategy for your events is one of the most effective ways to maximize revenue and offer your customers more choices.
But how do you manage different price points for different seats on the same seating chart? The answer lies in combining a visual seating map with the power of WooCommerce’s product variations.
This guide will walk you through the simple, modern way to set up WooCommerce tiered pricing for events, giving you a professional ticketing system that can significantly boost your bottom line.
If you’re selling all your tickets for a single flat price, you could be leaving money on the table. Tiered pricing allows you to:
- Capture More Value: Seats with a better view or more amenities (like a VIP table) can command a higher price.
- Increase Accessibility: Offering lower-priced “Standard” or “Balcony” seats makes your event accessible to a wider audience.
- Create Urgency: You can create “Early Bird” pricing tiers that expire after a certain date, encouraging early ticket sales.
- Offer Customer Choice: Attendees appreciate the ability to choose a ticket that fits their budget and desired experience.
Traditionally, setting this up in WordPress was a nightmare. You might have had to create multiple different simple products (“VIP Ticket,” “Standard Ticket”) and then try to explain to the user which one to buy, with no visual aid.
The modern solution integrates this directly into the seating chart. Here’s how it works:

- Create a “Variable Product” in WooCommerce: Instead of a “Simple Product,” you create a “Variable Product” for your event. Here, you’ll define an attribute called “Price Tier.”
- Define Your Tiers: For the “Price Tier” attribute, you’ll list your values, such as VIP | Standard | Balcony.
- Create Variations and Set Prices: WooCommerce will then allow you to create a variation for each tier and set a specific price for it. For example: VIP = $150, Standard = $75, Balcony = $50.
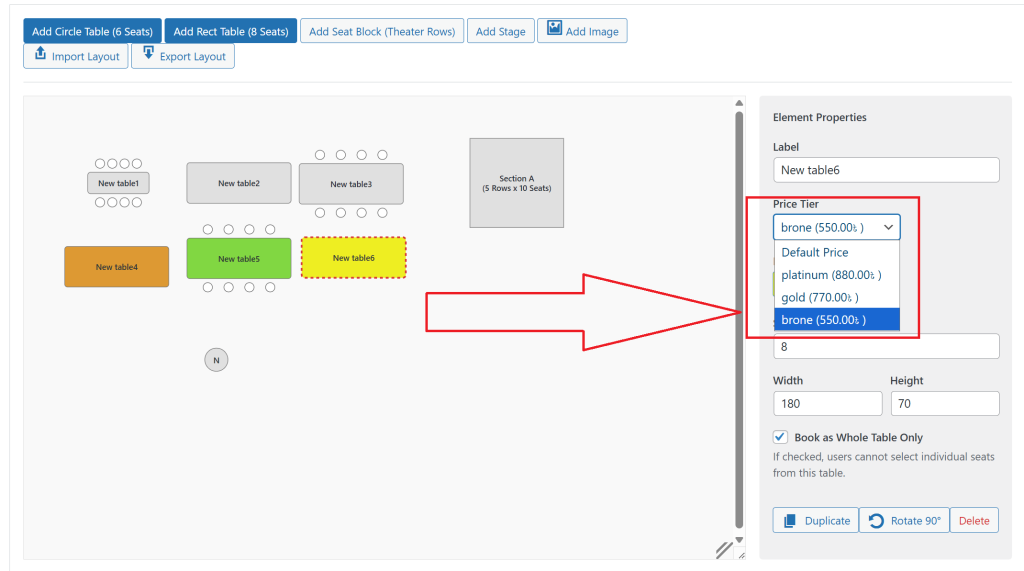
This is where the magic happens. A powerful seating chart plugin will automatically detect these variations. In your visual builder, you can then:
- Click on your front-row VIP table.
- In its properties, you’ll see a “Price Tier” dropdown.
- Simply select “VIP” from the list.
Now, any seat selected from that table will automatically be added to the cart at the $150 price. You can do the same for your “Standard” tables and your “Balcony” seat blocks. It’s an incredibly intuitive way to visually assign pricing across your entire venue. For a deep dive into product variations, the official WooCommerce documentation is an excellent resource.
Implementing WooCommerce tiered pricing for events doesn’t have to be complicated. By combining a visual seating map with variable products, you can create a user-friendly and highly profitable ticketing system.
Our Live Event Seating plugin is designed to work seamlessly with WooCommerce Variations, allowing you to assign price tiers directly in the drag-and-drop builder. If you’re ready to take control of your event pricing strategy.
