
Last updated: April 2026 · Plugin version: 1.5.0 (pro version)
Welcome to the official WordPress seating chart documentation for the Live Event Seating Pro plugin. Whether you are installing for the first time or looking for help with a specific feature — such as WooCommerce ticket sales, QR code check-in, seat add-ons, or the ticket template builder — you will find step-by-step instructions right here. Use the table of contents below to jump to any section. If you cannot find what you need, contact support via the plugin page.
Table of Contents
- Installation & Activation
- Prerequisites
- Installing the Plugin
- Initial Setup (Required Steps)
- Step 1: Create a WooCommerce “Ticket” Product
- Step 2: Create Your First Event
- Step 3: Display the Seating Plan with a Shortcode
- The Seating Plan Builder: A Detailed Guide
- The Canvas & Navigation (Zoom, Pan, Resize)
- Adding & Deleting Elements (Tables, Seat Blocks, etc.)
- The Inspector Panel: Editing Element Properties
- Importing & Exporting Layout Templates
- Advanced Features & Configuration
- Setting Up Tiered Pricing (Variable Products)
- Enabling “Book as Whole Table Only”
- Setting a Booking Window
- Event Day Management: The QR Code System
- How Tickets are Generated
- Using the Ticket Scanner
- Manual Ticket Check-in
- Global Settings
- Finding the Settings Page
- Configuring Booking Logic & Colors
- Customizing Text Labels
- Manually Setting Booking Status
- General Admission (GA) Areas with Capacity Control
- Freeform Drawing Tools (Decorative & GA)
- Precision 360° Rotation Slider
- WYSIWYG Seat Block Builder
- Blocking Individual Seats (Seat Holds)
- Selecting Multiple Elements
- Moving a Group of Elements
- Duplicating and Deleting a Group
- Choosing a Layout Mode
- Using the Smart Alignment Guides
- Real-Time Availability Polling (Frontend)
- Using the Sections Feature
- Using the Curved Seat Rows Feature
- Integrating with The Events Calendar
- Using the Booking Manager
- How to Duplicate a Layout
- Using Advanced Seat Numbering
- Integrating with Events Manager
- The Kill Seat Feature
- Editing Polygon Points
- Frontend Price Filtering
- Duplicating Sections with Content
- Seat Lock Timer (Cart & Checkout)
- Advanced Ticket & Email Builder
- Seat & Table Add-ons
- Waitlist / Waiting List System
- Seat Transfer / Ticket Swap
- Group / Bulk Booking with Auto Seat Picker
- Wheelchair / Accessibility Seat Marking
- Guest Name Assignment
- Multi-Date Events
- Manual Order Management (Walk-in / Offline Bookings)
- Frequently Asked Questions (FAQ)
- Need Woocommerce for this plugin
1. Installation & Activation
Prerequisites
Before you begin, please ensure you have the following installed and activated on your WordPress site:
- WordPress 5.8 or higher
- WooCommerce 6.0 or higher
- PHP GD Graphics Library: This is a standard PHP extension required for QR code generation. If you encounter issues with QR codes, please contact your web host and ask them to enable the gd extension.
Installing the Plugin
- Download the plugin .zip file from your purchase confirmation email or your account page.
- In your WordPress dashboard, navigate to Plugins > Add New.
- Click the “Upload Plugin” button at the top of the page.
- Click “Choose File” and select the .zip file you downloaded.
- Click “Install Now” and then “Activate Plugin”.
2. Initial Setup (Required Steps)
Follow these three steps to get your first seating plan live.
Step 1: Create a WooCommerce “Ticket” Product
Every seat sold is managed by a WooCommerce product.
- For a Single Price:
- Go to Products > Add New.
- Give it a name, like “Gala Dinner Ticket”.
- In the “Product data” section, keep it as a “Simple product”.
- Set a “Regular price”. This will be the price for one seat.
- Publish the product.
- For Tiered Pricing (e.g., VIP, Standard):
- Please see the “Setting Up Tiered Pricing” section in the advanced guide below. You must use a “Variable product”.
Step 2: Create Your First Event
- Navigate to the Events menu in your WordPress dashboard and click Add New.
- Give your event a title (e.g., “Annual Charity Gala 2024”).
- Scroll down to the “Event Seating Settings” box.
- From the “Link to WooCommerce Product” dropdown, select the product you created in the previous step.
- Now, use the “Seating Plan Builder” to design your layout. (See the detailed guide below).
- Click “Publish” or “Update” to save your event and its layout.
Step 3: Display the Seating Plan with a Shortcode
- While editing your event, find the “Event Seating Settings” box.
- Copy the automatically generated Shortcode (it will look like [event_seating_plan id=”123″]).
- Paste this shortcode into the main content area of your event post, or onto any other page or post where you want the seating map to appear.
That’s it! Your interactive seating plan is now live on your website. Check live demo
3. The Seating Plan Builder: A Detailed Guide
The builder is where you bring your venue to life. This WordPress seating chart documentation covers every builder tool in detail.
The Canvas & Navigation
- Canvas: The main grid area where you will place your elements.
- Resize: To make the canvas larger, click and drag the handle in the bottom-right corner.
- Pan (Move the View): Hold Shift + Left-Click and drag, or use your Middle Mouse Button to move the canvas around.
- Zoom: Use the + and – buttons in the bottom-right corner to zoom in and out. The middle button resets the view.
Adding & Deleting Elements
Use the buttons at the top of the builder to add elements to your canvas:
- Add Circle/Rect Table: Adds a table for guests.
- Add Seat Block: Adds a block of seats in rows, perfect for theaters.
- Add Stage / Add Image: Adds decorative, non-bookable elements to your map.
To delete an element, simply click on it and then click the “Delete” button in the Inspector Panel on the right.
The Inspector Panel: Editing Element Properties
When you click on any element on the canvas, the Inspector Panel will appear on the right, showing only the relevant options for that element.
- Label: The public name of the element (e.g., “VIP Table 1,” “Orchestra Section”).
- Element Color: Sets a custom background color for the table, stage, or seat block.
- Price Tier: (Requires a Variable Product) Assigns a specific price tier to this element. All seats within it will be sold at this price.
- Dimensions (Width/Height/Radius): Precisely control the size of your elements.
- Seats/Rows: Define the capacity of a table or the structure of a seat block.
- Book as Whole Table Only: (For tables only) If checked, this table must be booked as a single unit. Individual seats cannot be selected.
- Actions (Duplicate, Rotate): Quickly copy an element or rotate rectangular elements by 90 degrees.
Importing & Exporting Layout Templates
- Export: Once you have a layout you want to reuse, click the “Export Layout” button. This will save a .json file of your design (without any booking data) to your computer.
- Import: On a new event, click “Import Layout”, select the .json file you previously saved, and your entire seating chart will be instantly recreated.
4. Advanced Features & Configuration
Setting Up Tiered Pricing (Variable Products)
- Go to Products > Add New.
- Change the “Product data” dropdown to “Variable product”.
- Go to the “Attributes” tab and click “Add”.
- Name: Price Tier (or similar).
- Values: Enter your tiers separated by a pipe |. Example: VIP | Standard | Balcony.
- Check the “Used for variations” box and click “Save attributes.”
- Go to the “Variations” tab. From the dropdown, select “Create variations from all attributes” and click “Go.”
- For each variation that appears, expand it and set a price.
- Save the product. Now you can link this Variable Product to your event and assign these tiers in the builder.
Enabling “Book as Whole Table Only”
- In the seating plan builder, click on a table.
- In the Inspector Panel, check the box labeled “Book as Whole Table Only”.
- Save the event. On the frontend, this table will now be a single clickable item.
Setting a Booking Window
- While editing your event, find the “Event Seating Settings” box.
- Use the date pickers for “Booking Open Date” and “Booking Close Date”.
- If left blank, booking is open indefinitely. If dates are set, the seating plan will only be visible to customers within that date range.
5. Event Day Management: The QR Code System
How Tickets are Generated
After a customer successfully completes a purchase, a single “Master Ticket” with a unique QR code is generated for their entire order. This is:
- Displayed on the on-screen Order Confirmation (“Thank You”) page.
- Sent to the customer in their Order Confirmation email.
- Visible to you in the Admin Order Details page.
For more on tickets, refer back to the top of this WordPress seating chart documentation page. Customers can show the QR code on their phone or a printout. The ticket also includes a list of all seats in their order and key payment details.
Using the Ticket Scanner
- Navigate to Events > Ticket Scanner in your WordPress admin. (For The Events Calendar, it will be under their “Events” menu).
- The page will request permission to use your device’s camera. Allow it.
- Point the camera at the customer’s QR code.
- The system will provide an instant on-screen result:
- Success: Confirms the check-in and shows guest details.
- Already Used: Shows an error with the time of the first scan to prevent fraud.
- Invalid: Shows an error if the QR code is not from your system.
Manual Ticket Check-in
If a scan fails (e.g., cracked phone screen), you can use the “Manual Ticket Entry” field on the scanner page. Simply type in the Master Ticket Code (e.g., LESO-123-45678) and click “Verify Code.”
6. Global Settings
To configure global options for the plugin, navigate to Seating Plan > Settings in your WordPress admin menu.
Here you can control:
- Booking Logic: Enable/disable the “Orphan Seat” rule, set the maximum number of seats per order, and define the seat lock time.
- Seat Colors: Use color pickers to customize the colors for Available, Selected, and Booked seats to match your brand.
7. Customizing Text Labels & Font Sizes
Make your labels more readable or match your brand’s style. For any element with a label (Tables, Stages, Seat Blocks), you can set:
- Text Color: Use the color picker to select a custom color for the label text.
- Font Size: Enter a pixel value to increase or decrease the size of the label text.
8. Manually Setting Booking Status
This is an essential tool for managing your event inventory without creating a formal order.
- How it works: For any bookable element (Tables or Seat Blocks), a “Status” dropdown will appear in the inspector.
- Available: This is the default. The element and its seats are available for customers to book.
- Booked / Unavailable: If you select this, the entire element (and all seats within it) will be instantly marked as “Booked” on the frontend. This is perfect for:
- Reserving seats for VIPs or special guests.
- Blocking off tables for staff or technical equipment.
- Holding seats that were sold offline.
This manual override gives you complete control to block off any part of your seating chart from public sale.
You can now create and sell tickets for standing-room sections, festival fields, or any area that doesn’t have assigned seats. The system will automatically track the number of tickets sold and prevent overselling.
9. How to Add a General Admission Area:
- Edit Your Event: Go to the event where you want to add a GA section. Scroll down to the Seating Plan Builder.
- Choose a Shape: In the builder controls, you will see two new buttons:
- [Add GA Rectangle]: Click this to add a standard rectangular GA area to your canvas.
- [Add GA Freeform]: Click this to start drawing a custom-shaped GA area (see Freeform Drawing Tools below for drawing instructions).
- Position and Resize: Drag the new GA area to position it. If it’s a rectangle, you can resize it using the Width and Height fields in the Inspector.
- Set the Capacity: With the GA area selected, the Inspector panel will appear on the right. Find the “Capacity” field and enter the maximum number of tickets that can be sold for this area.
- (Optional) Assign a Price Tier: If you want this GA area to have a different price from your default ticket, select a Price Tier from the dropdown. This requires you to have a Variable Product linked to the event.
How it looks for customers:
On the frontend, customers will see the GA area on the map with its name and the number of available tickets (e.g., “450 / 500 Available”). When they click it, a quantity selector will appear in the summary box, allowing them to choose how many GA tickets they wish to purchase.
10. Freeform Drawing Tools (Decorative & GA)
Your venue layouts are no longer limited to basic shapes. Use the polygon tool to draw decorative elements like stages and dance floors, or to create custom-shaped General Admission areas.
How to Draw a Freeform Shape:
- Select the Drawing Tool:
- For a decorative shape, click the [Add Freeform Shape] button.
- For a General Admission area, click the [Add GA Freeform] button.
- Start Drawing: Your cursor will turn into a crosshair. Click anywhere on the canvas to place your first point.
- Add More Points: Move your mouse and click again to place the next point. A line will follow your cursor, showing you the shape as you build it.
- Finish the Shape: You have two easy ways to finish:
- Double-click to place your final point and complete the shape.
- Click the Starting Point: Once you have at least three points, a small circle will appear at your starting point. Clicking this circle will close and complete the shape.
After finishing, the shape becomes a standard element. You can select it, drag it, and use the Inspector to change its Label, Color, or Price Tier.
11. Precision 360° Rotation Slider
You can now rotate elements with complete freedom, allowing for more realistic and optimized layouts. This feature is available for tables, seat blocks, images, stages, and GA rectangles.
How to Rotate an Element:
- Select an Element: In the builder, click on any table, seat block, or other rotatable element.
- Find the Rotation Control: In the Inspector panel on the right, you will see a new “Rotation” control.
- Rotate Your Element: You have two ways to set the rotation:
- Slider: Drag the slider handle to rotate the element in real-time on the canvas. This is great for quick visual positioning.
- Number Input: For perfect accuracy, type a precise degree value (from 0 to 360) into the number box next to the slider.
The element’s rotation is saved automatically. This is perfect for angling tables to fit in a corner or aligning seat rows with a curved wall.
12. WYSIWYG Seat Block Builder
The builder for theater-style rows (“Seat Blocks”) is now a true “What You See Is What You Get” (WYSIWYG) editor. You no longer have to guess what your layout will look like.
How it Works:
This feature is enabled automatically. There are no new steps to learn!
- Add a Seat Block: Click the [Add Seat Block] button as you normally would.
- See the Seats: Instead of a simple grey box, the builder will now instantly draw a grid of circles, representing every single seat within that block.
- Edit in Real-Time: When you select the block and change the Rows, Seats per Row, Width, or Height in the Inspector, you will see the grid of seats on the canvas update instantly.
This provides immediate visual feedback, making it much faster and easier to design complex seating arrangements with confidence. The “Element Color” option has been removed for this element type, as there is no longer a background to color. You can still style the section’s Label using the text styling options.
13. How to Block and Unblock Seats
The entire process is handled within a special editing mode in the Seating Plan Builder.
Step 1: Activate “Block Seats” Mode
Navigate to your event’s Seating Plan Builder. In the top control bar, you will find the [Block Seats] button.
- Click the [Block Seats] button.
- The button will turn a solid dark color (or blue), indicating that Block Mode is active.
- Your mouse cursor will change to a pointer when you hover over individual seats, letting you know you can interact with them.
Step 2: Click to Block or Unblock Seats
While in Block Mode, you can simply click on any individual seat within a table or a seat block to toggle its status.
- To Block a Seat: Click on any green (available) seat. It will instantly turn grey, marking it as blocked and unavailable for public sale.
- To Unblock a Seat: Click on any grey (blocked) seat. It will instantly turn green again, making it available for customers to purchase.
Step 3: Exit “Block Seats” Mode
When you are finished blocking or unblocking seats, simply click the active [Block Seats] button again.
- The button will return to its normal appearance.
- Your cursor will go back to normal.
- You can now resume editing your layout as usual (e.g., dragging and rotating entire elements).
What Your Customers Will See
This feature is completely seamless for the end-user. Any seat that you have marked as “blocked” in the admin panel will appear as unavailable on the live seating map on the frontend. Customers will not be able to click on it or add it to their cart.
Important Tip: Blocking Individual Seats vs. Blocking Whole Elements
The [Block Seats] tool is for controlling individual seats within an element (like one seat at a 10-person table).
If you need to make an entire element (like a whole table or an entire seat block) unavailable, select the element and use the “Status” dropdown in the Inspector panel on the right, setting it to “Booked / Unavailable.”
14. Selecting Multiple Elements
There are two easy ways to select more than one element at a time.
Using the Marquee (Selection Box)
This is the fastest way to select a group of elements in a specific area of your canvas.
- Click and Hold: Position your mouse on an empty area of the canvas, outside of any element.
- Drag to Draw: Click and drag your mouse. A blue selection box (a “marquee”) will appear.
- Cover the Elements: Expand the box to cover the elements you want to select. An element only needs to be partially touched by the box to be included.
- Release: Release the mouse button. All elements inside the box will now be selected, indicated by a red border around each of them.
Using Shift + Click
This method is perfect for adding or removing individual elements from a selection, especially if they are far apart.
- Select Your First Element: Click on any element to select it.
- Hold the Shift Key: Press and hold the Shift key on your keyboard.
- Click Other Elements:
- Clicking on any unselected element will add it to your current selection.
- Clicking on any already selected element will remove it from your current selection.
You can combine these methods! For example, use the marquee to select a large group, then hold Shift and click to deselect one or two items from that group.
Note on the Inspector: The property Inspector on the right will only appear when exactly one element is selected. When multiple elements are selected, the Inspector is hidden to avoid confusion, but you can still perform group actions like moving, duplicating, and deleting.
15. Moving a Group of Elements
Once you have multiple elements selected, moving them together is simple.
- Select Your Group: Use either the marquee or Shift + Click to select the elements you want to move.
- Click and Drag: Position your mouse over any one of the selected elements.
- Move the Group: Click, hold, and drag your mouse. The entire group of selected elements will move together, maintaining their relative positions.
- Release: Release the mouse button to place the group in its new location.
16. Duplicating and Deleting a Group
You can perform actions on all selected elements at once.
To Duplicate a Group:
- Select the elements you wish to duplicate.
- The Inspector panel will appear on the right, showing only the actions available for a multi-selection.
- Click the [Duplicate] button.
- A copy of every selected element will be created and slightly offset. The new copies will be automatically selected, ready for you to drag into position.
To Delete a Group:
- Select the elements you wish to delete.
- You have two options:
- Click the [Delete] button in the Inspector panel.
- Press the Delete or Backspace key on your keyboard.
- All selected elements will be removed from the canvas instantly.
17. Getting Started: Choosing a Layout Mode
When you first create a seating chart for a new event, you will be prompted to choose a layout mode. This is the foundational structure of your chart and cannot be changed later for that event.
1. Single Layout Mode
The Single Layout mode is the simplest way to build a chart and is ideal for venues that consist of a single, open space like a wedding hall, conference room, or small theater.
When to use it:
- Your event takes place in one room.
- You don’t need to logically separate areas like “Balcony” vs. “Floor”.
- You want to quickly add tables and chairs to a single canvas.
How it works:
Once you select “Single Layout,” you will be taken directly to the main builder canvas where you can immediately start adding tables, rows of seats, stages, and other elements using the toolbar.
2. Use Sections Mode
The Use Sections mode is a powerful feature for organizing complex venues into logical, manageable areas. This is the recommended choice for theaters, auditoriums, stadiums, or any event with distinct pricing or seating zones.
When to use it:
- Your venue has multiple floors or rooms (e.g., “Main Floor,” “Mezzanine,” “Balcony”).
- You have distinct areas with different pricing tiers (e.g., “VIP Section,” “General Admission”).
- Your chart is very large, and you want to provide a cleaner, zoomable experience for customers.
How it works:
- Select “Use Sections” from the initial modal.
- You will start in the Venue Overview. This is a top-down view of your entire venue space.
- Use the “Add Section” or “Add Freeform Section” buttons to draw the outlines of each area (e.g., draw a large rectangle for the “Orchestra” and another for the “Balcony”). You can name and color each section using the Inspector panel on the right.
- To add seats and tables, double-click on a section. This will “zoom in” and take you to that section’s dedicated canvas.
- Inside a section, use the toolbar to add tables, rows of seats, etc., just as you would in the Single Layout mode. These elements now belong to that section.
- Click the “Back to Venue” button in the top-left to return to the main overview.
On the frontend, customers will see the Venue Overview first. Clicking a section will smoothly zoom them into that area to select their seats.
18. Using the Smart Alignment Guides
The Smart Alignment Guides help you create clean, professional layouts with perfect alignment. The guides appear automatically while you are dragging elements.
How they work:
- Select an Element: Click on any table, seat block, or other element on the canvas.
- Drag the Element: As you click and drag the element, you will see up to six dashed blue lines appear:
- Three Vertical Lines: Marking the left edge, center, and right edge of your selection.
- Three Horizontal Lines: Marking the top edge, center, and bottom edge of your selection.
- Align with Other Objects: Move the element until its guide lines snap visually with the edges or center of other elements on the canvas.
- Multi-Select Alignment: This feature also works when you have multiple elements selected. The guides will show the boundaries of the entire group, making it easy to move a whole block of tables while keeping them aligned.
The guides disappear automatically when you release the mouse button.
19. Real-Time Availability Polling (Frontend)
This feature works automatically on the frontend to ensure your customers always see the most up-to-date seat availability.
How it works for the User:
- When a customer is viewing a seating chart, the chart silently checks with the server every 20 seconds.
- If another person has booked a seat or has a seat held in their cart, that seat will automatically turn gray and become unselectable on everyone else’s screen.
- This happens in the background without requiring the user to refresh the page.
What you need to know as an Admin:
- This feature is enabled by default and requires no configuration.
- It helps prevent overselling seats and reduces customer confusion, especially during high-traffic sales periods.
- The polling interval is set to a reasonable 20 seconds to balance real-time accuracy with server performance.
20. Using the Sections Feature
The Sections feature is a powerful tool designed for creating complex layouts for venues with multiple rooms, floors, or distinct areas (e.g., Balcony, Orchestra, Floor Level). It allows you to build your chart in a more organized, hierarchical way.
1. Getting Started: Choosing Your Layout Mode
When you create a new event and open the “Seating Plan Builder” for the first time, you will be prompted to choose a layout mode:
- Single Layout: Best for simple venues like a single room or hall. You add all tables and seats directly to one main canvas.
- Use Sections: Best for complex venues. You first create the main areas (Sections) and then add tables and seats inside each one.
Important: This choice is permanent for this specific event. Once you add an element, you cannot switch modes.
2. The Venue View: Your Main Blueprint
After choosing “Use Sections,” you will start in the Venue View. Think of this as the main blueprint of your entire venue.
- Purpose: To add and arrange the main areas (Sections) of your venue.
- Available Tools: In this view, your primary tools are:
- Add Section: Adds a standard rectangular section.
- Add Freeform Section: Allows you to draw a section with any shape (e.g., an L-shaped room, a curved balcony).
- Add Stage / Add Image: You can also add venue-wide elements like a main stage or background images that are not inside any specific section.
How to Add a Section:
- Click “Add Section” to create a rectangle. You can move, resize, rotate, and change its properties (label, color) in the Inspector panel on the right.
- Click “Add Freeform Section” to start drawing mode.
- Click on the canvas to place the first point.
- Continue clicking to add more points to create your shape.
- To finish, either double-click or click on the very first point you made.
- Press the Esc key at any time to cancel drawing.
3. The Section View: Adding the Details
Once you have created a section, you need to add tables and seats inside it.
- How to Enter a Section: Double-click on any section shape in the Venue View.
- What Happens: The builder will zoom in, and the canvas will now show the contents of only that section. The toolbar will change, and an indicator will appear at the top showing which section you are currently editing.
- Purpose: To add and arrange the seating elements (tables, seat rows, GA areas) for that specific area.
- Available Tools: Inside a section, you have the full set of tools:
- Add Circle/Rect Table
- Add Seat Rows
- Add Stage, Image, or other shapes
- Add General Admission Areas
- Positioning: All elements you add are positioned relative to the section itself. If you go back to the Venue View and move the entire “Balcony” section, all the seats inside it will move with it automatically.
4. Navigating Back and Forth
- To Exit a Section: Click the “< Back to Venue” button in the top-left of the toolbar. This will take you back to your main venue blueprint.
- To Enter a Section: Simply double-click the section you want to edit from the Venue View.
This workflow allows you to focus on one area at a time without being distracted by the rest of the venue, making the management of large, complex layouts simple and efficient.
21. Using the Curved Seat Rows Feature
The Curved Seat Rows feature allows you to arrange seats in an arc instead of a straight line. This is essential for accurately representing venues like theaters, concert halls, and arenas.
When to Use This Feature
This feature is available exclusively for the “Seat Rows” element in the Seating Plan Builder.
How to Create Curved Seat Rows
Follow these simple steps to apply a curve to your seating block:
- From the builder tools, click “Add Seat Rows” to add a new block to your canvas, or click on an existing “Seat Rows” block to select it.
- With the block selected, the Inspector panel will appear on the right side of the builder.
- Locate the “Curve” control in the Inspector. It includes both a slider for quick adjustments and a number input for precise values.(Screenshot Placeholder: An image of the Inspector panel with a red box highlighting the “Curve” slider and number input.)
- Use the slider or enter a number to set the curve amount. The seats on the canvas will update instantly.
Understanding Curve Values
The curve is measured in degrees and determines the total angle spanned by the arc of seats.
- 0 (Default): The row is a perfectly straight line.
- Positive Values (e.g., 1 to 180): Creates a downward-facing arc (like a smile: ◡). This is ideal for seating that wraps around a stage located at the bottom of the chart.
- Negative Values (e.g., -1 to -180): Creates an upward-facing arc (like a frown: ◠). This is perfect for seating that faces a stage located at the top of the chart.
Tips and Best Practices
- Start Small: Begin with small values (like 20 or -20) and increase them gradually to see the effect. Extreme values can create very tight circles.
- Combine with Rotation: You can use the “Rotation” control in combination with “Curve” to create complex angled and curved sections.
- Width Affects Span: The “Width” property of the seat block now controls the horizontal distance (the chord length) between the start and end of the arc. Increasing the width will make the arc wider and less sharp for the same curve value.
- Preview in Sections: When using the “Use Sections” layout mode, the preview of your seat block inside the section overview will now correctly display as a curve, giving you a more accurate mini-map of your venue.
22. Integrating with The Events Calendar
Our plugin is designed to work seamlessly with The Events Calendar, allowing you to add a powerful seating chart to any event. This guide will walk you through setting up and using the integration.
Requirements:
- Live Event Seating (this plugin)
- The Events Calendar
- WooCommerce
You do not need any additional ticketing add-ons like Event Tickets Plus. Our plugin connects directly to WooCommerce products.
Step 1: Enabling the Integration
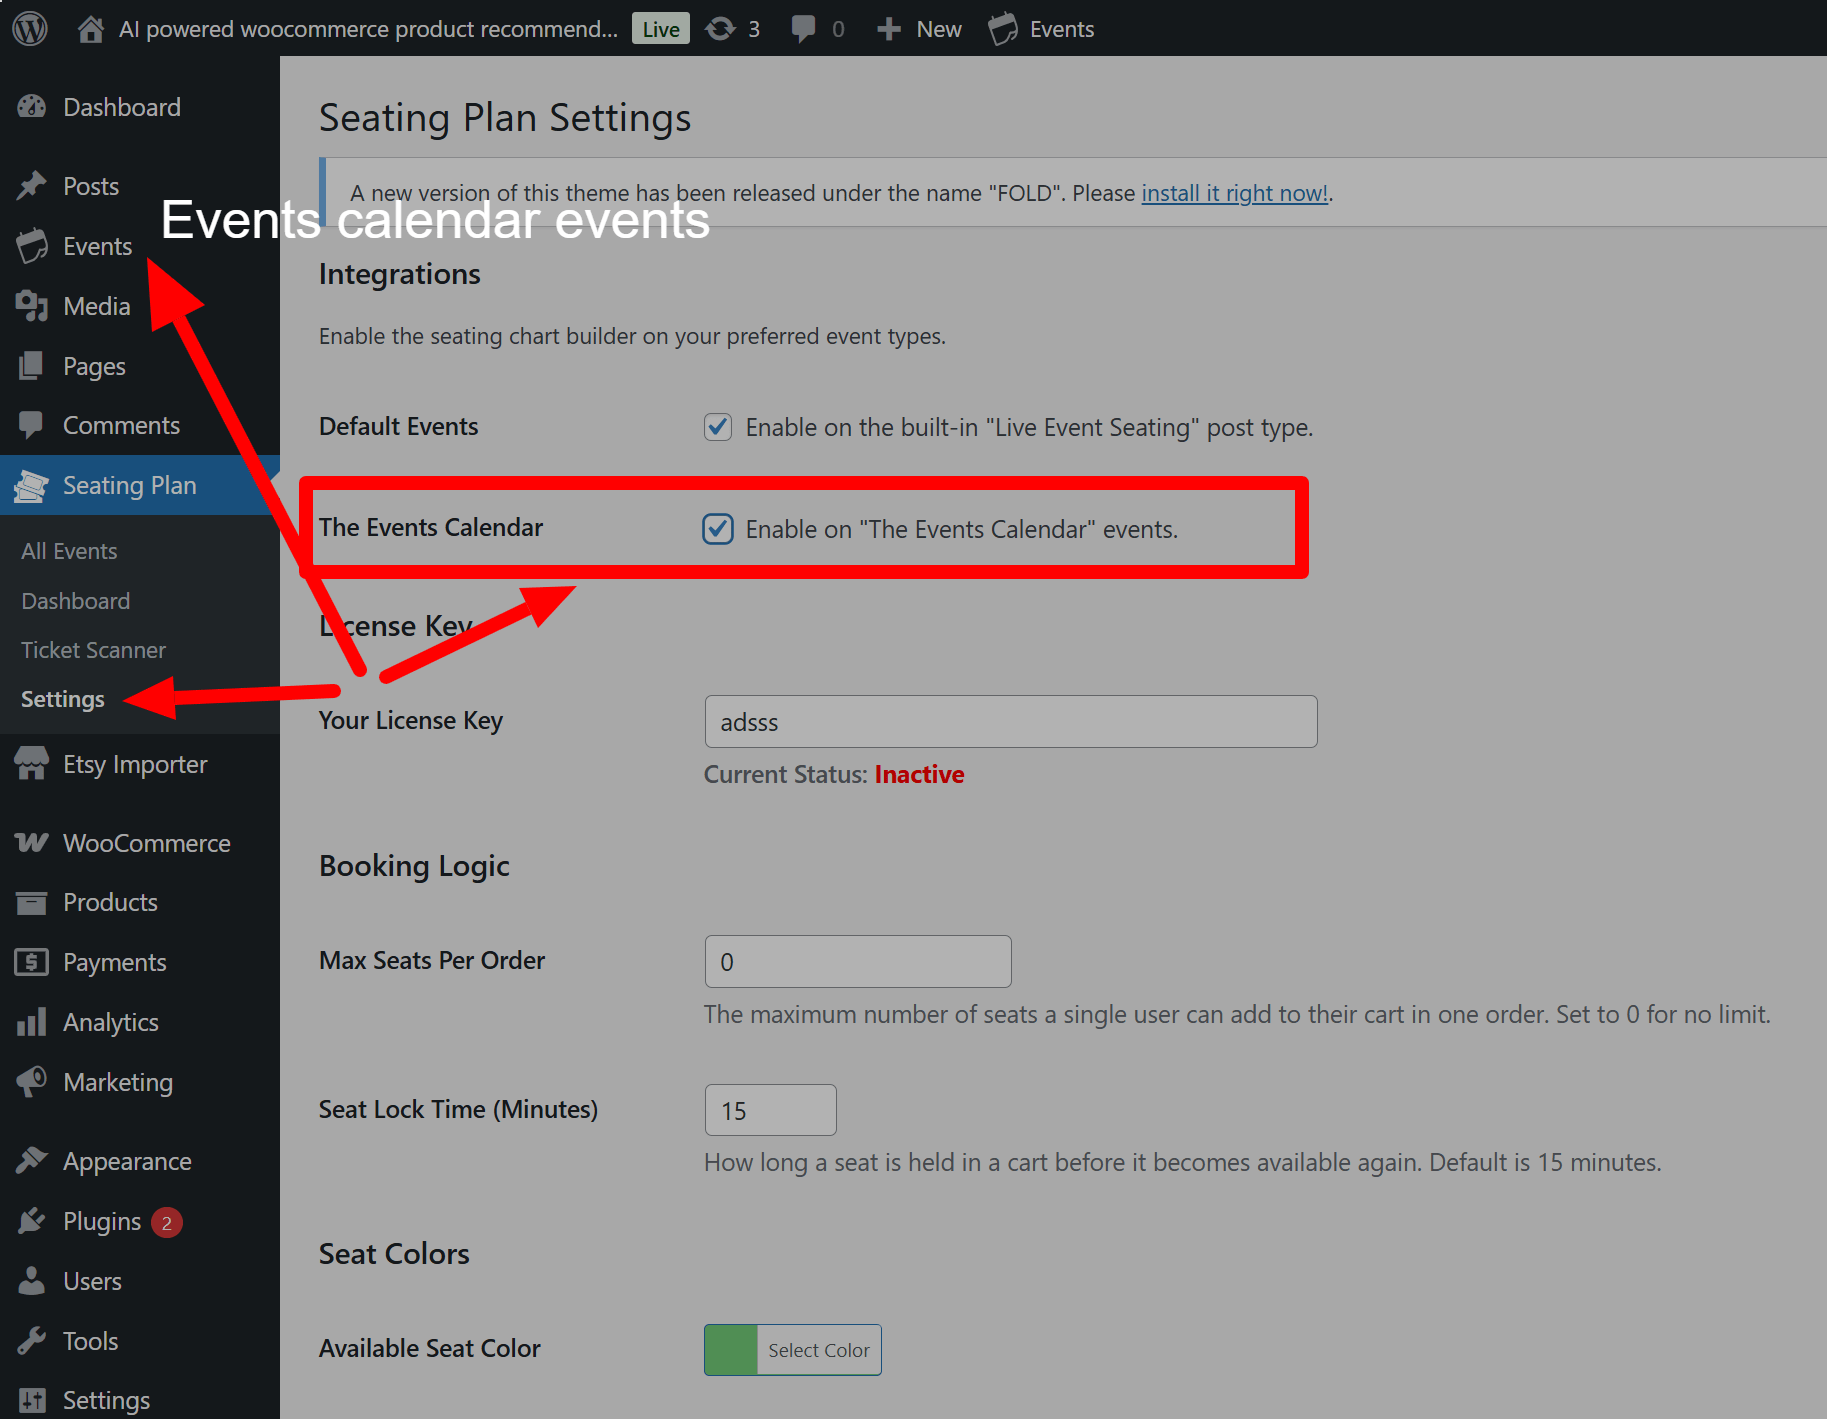
The integration is enabled by default upon installation, but you can verify or manage it in the settings.
- In your WordPress dashboard, navigate to Seating Plan > Settings.
- At the top, you will see the Integrations section.
- Ensure the checkbox for “Enable on ‘The Events Calendar’ events” is checked. This tells our plugin to add the builder to The Events Calendar’s edit screen.
- Click Save Settings.
Step 2: Creating a WooCommerce Product for Your Tickets
Before building your seating chart, you need a WooCommerce product to represent the ticket sale.
- Navigate to Products > Add New in your WordPress dashboard.
- Give your product a clear title (e.g., “Main Stage Show Ticket”).
- Set the Price:
- For a single price event: In the “Product data” metabox, enter a Regular price.
- For multiple price tiers (e.g., VIP, Standard, Balcony): Change the “Product data” dropdown to Variable product. Go to the “Attributes” tab, add an attribute like “Tier,” and enter your price levels (e.g., “VIP | Standard | Balcony”). Then, go to the “Variations” tab and create variations from these attributes, setting a price for each one.
- Publish your product. You do not need to link this product to The Events Calendar itself.
Important: This WooCommerce product is what your customers will actually purchase. The seating chart acts as a “selector” for this product.
Step 3: Creating Your Event & Building the Seating Chart
Now, create your event and design the layout.
- Navigate to Events > Add New.
- Fill out your event details as you normally would in The Events Calendar (title, description, date, venue, etc.).
- Scroll down the page to find the “Seating Plan Builder” metabox. Design your layout by adding tables, seat rows, or sections.
Step 4: Linking the Seating Chart to Your Product
This is the final and most important step.
- On the right-hand sidebar of the event edit page, find the “Event Seating Settings” metabox.
- Click the “Link to WooCommerce Product” dropdown. You will see a list of all products in your store. Select the ticket product you created in Step 2.
- (Optional – For Multiple Tiers): If you created a Variable product, you can now assign different price tiers within the builder.
- Select a seat, table, or section in the builder.
- In the Element Properties inspector on the right, use the “Price Tier” dropdown to assign one of the variations you created (e.g., “VIP,” “Standard”). This will override the default price for that specific element.
- Publish or Update your event.

That’s it! When you insert the shortcode [event_seating_plan id=”YOUR_EVENT_ID”] into your event’s description, the seating chart will appear. The chart will pull the date and venue directly from The Events Calendar, and all ticket sales will be processed through the WooCommerce product you linked.
23. Using the Booking Manager
The Booking Manager is a central dashboard where you can view, search, and manage all bookings made through your seating charts.
Accessing the Booking Manager:
Navigate to Seating Plan > Bookings in your WordPress admin menu.
(Screenshot: An image of the WordPress admin menu with “Seating Plan” open and an arrow pointing to the “Bookings” submenu item.)
Features:
- Viewing Bookings: The main table displays all individual bookings, including the event, the specific seat/area, customer details, and order number.
- Searching: Use the search box at the top right to instantly find bookings. You can search by:
- Customer Name or Email
- Order Number
- Event Title
- Seat/Area Label (e.g., “Section A”)
- Specific Seat Number (e.g., “Row 5, Seat 10” or just “5 10”)
- One-Click Check-in: In the “Status” column, click the “Check In” button next to any booking to mark the attendee as arrived. The status will instantly update to “Checked In” with a timestamp. This is a great alternative to using the QR code scanner.
- Exporting to CSV:
- Click the “Export to CSV” button at the top of the page.
- This will download a CSV file of the bookings you are currently viewing.
- Tip: To export a specific subset of data, first use the search box to filter the list (e.g., search for a specific event title), and then click “Export to CSV”. The downloaded file will contain only the filtered results.
24. How to Duplicate a Layout
This feature allows you to copy a seating plan from one event to another, saving you time.
Instructions:
- Navigate to the edit screen of the event where you want to apply the layout.
- In the “Event Seating Settings” metabox on the right sidebar, locate the “Layout Tools” section.
- Click the dropdown menu labeled “Select an event to copy layout from.” It will show a list of all other events on your site that have a saved seating plan.
- Choose the event you wish to copy.
- Click the “Apply Layout” button.
- A confirmation prompt will appear. Click “OK”.
The builder will instantly reload with the duplicated layout. Remember to click “Update” or “Publish” on the event to save the new layout.
Warning: Applying a layout is a destructive action and will overwrite the current seating plan on the page.
25. Using Advanced Seat Numbering
You can customize the labels for seats and rows to match your venue’s physical signage. These options are available when you select a Table or a Seat Rows element.
Instructions:
- In the Seating Plan Builder, click on a table or a seat rows block to select it.
- The Inspector panel will appear on the right.
- Locate the “Seat Label” and “Start At” fields.
- Seat Label: Choose between “Numeric (1,2,3)” or “Alpha (A,B,C)”. This controls the label on individual seats.
- Start At: Enter the number you want the sequence to begin with. For example, if you set “Start At” to 101, your seats will be labeled 101, 102, 103….
- (For Seat Rows Only): You will also see a “Row Label Style” field.
- This allows you to label your rows as Row 1, Row 2… or Row A, Row B…. The seat IDs will be updated accordingly (e.g., Row A, Seat 5).
The changes will appear instantly on the canvas.
26. Integrating with Events Manager
Our plugin can integrate directly with the Events Manager plugin, allowing you to add powerful, reserved seating charts to your existing events and sell tickets through WooCommerce.
Requirements:
- Live Event Seating (this plugin)
- Events Manager
- WooCommerce
You do not need any other third-party ticketing add-ons.
Step 1: Enabling the Integration
The integration is enabled by default if the plugin is active, but you can manage it in the settings.
- In your WordPress dashboard, navigate to Seating Plan > Settings.
- In the Integrations section at the top, ensure the checkbox for “Enable on ‘Events Manager’ events” is checked.
- Click Save Settings.
With this enabled, the seating chart builder will appear on the Events Manager event edit screen.
Step 2: Creating a WooCommerce Product for Your Tickets
First, you need a WooCommerce product that will handle the payment for your tickets.
- Navigate to Products > Add New.
- Give the product a clear title (e.g., “Annual Gala Ticket”).
- Set the Price:
- For a single price: In the “Product data” metabox, enter a Regular price.
- For multiple prices: Change the “Product data” dropdown to Variable product. Use the “Attributes” and “Variations” tabs to create your different tiers (e.g., “Front Row,” “Standard”) and set a price for each.
- Publish the product.
Step 3: Creating Your Event in Events Manager
Now, create your event using the familiar Events Manager interface.
- Go to Events > Add New.
- Fill in your event details: Title, description, dates, and times.
- Crucially, add a Location. Our plugin will automatically pull the Venue Name and Address from the Location you select here.
Step 4: Building and Linking Your Seating Chart
On the same event edit page, you can now connect everything.
- Scroll down to the “Seating Plan Builder” and design your venue’s layout.
- In the sidebar, find the “Event Seating Settings” metabox.
- From the “Link to WooCommerce Product” dropdown, select the ticket product you created in Step 2.
- (Optional – For Multiple Tiers): If you are using a Variable product, select any seat or section in the builder. The “Price Tier” dropdown in the inspector will now show your variations. Assign them as needed.
- Publish or Update your event.
That’s it! Your seating chart is now live. When you use the shortcode [event_seating_plan id=”YOUR_EVENT_ID”], the chart will automatically display the correct date and rich venue details from Events Manager, and all sales will be processed securely by WooCommerce.
27. How to use the “Kill Seat” Feature
The Kill Seat feature allows you to hide specific seats from the frontend view entirely. This is essential for creating irregular row lengths (e.g., a row of 10 seats followed by a row of 12) or creating aisles within a block of seats.
“Block” vs. “Kill”: What is the difference?
- Block Seats (Padlock Icon): The seat is visible to the customer but appears greyed out/unavailable. Use this for seats that are sold offline, reserved for VIPs, or temporarily broken.
- Kill Seats (Hidden Eye Icon): The seat is removed from the customer view entirely. It looks like empty space on the website. Use this to change the shape of your rows or create walkways.
How to use it:
- Open the Seating Plan Builder for your event.
- In the top toolbar, look for the Kill Seats button (Eye icon with a strike-through).
- Click the button to activate the mode. The button will turn blue.
- Click on any seat in your layout.
- Backend View: The seat will turn white with a red outline. This allows you to see where the seat would be, in case you need to bring it back later.
- Frontend View: After saving, visit your event page. The seat will be completely invisible.
- Click the Kill Seats button again to exit the mode.
- Click Save Changes.
Pro Tip: Creating Curved/Pyramid Rows
Instead of adding 10 individual rows of different sizes to make a curved theatre section:
- Add a single Seat Block that covers the widest part of your section (e.g., 10 rows x 20 seats).
- Select Kill Seat Mode.
- Click the seats in the corners of the block to “sculpt” the shape you want.
- This keeps your alignment perfect while giving you a custom shape!
Impact on Booking Rules
If you have the “Disable Orphan Seat Rule” unchecked (meaning the rule is active), the system treats “Killed” seats as walls. A customer cannot leave a single empty seat next to a “Killed” seat, ensuring your booking logic remains secure.
28. Editing Polygon Points
Allows administrators to adjust the shape of freeform elements after they have been drawn. This applies to Sections, GA Areas, and decorative Polygons.
How to use:
- Open the Seating Plan Builder in the admin panel.
- Click to select a Freeform Section, GA Area, or Polygon Shape on the canvas.
- Look at the Inspector Panel (right sidebar). You will see a button labeled “Edit Shape Points”.
- Click the button. Small white circular handles will appear at every corner of your shape.
- Click and drag these white handles to reshape your element.
- Note: Smart Guides will appear to help you align points with other objects.
- When finished, click “Done Editing Points” in the Inspector panel.
- Click “Save Changes” to persist your updates.
29. Frontend Price Filtering
A user-friendly dropdown menu that appears above the seating chart, allowing customers to visualize seats based on their price category.
Prerequisites:
- You must be using a Variable Product linked to the event.
- You must assign these variations to specific seats or areas in the Seating Plan Builder.
How it works:
- The plugin automatically scans your layout to find which Price Tiers (Variations) are in use.
- On the frontend event page, a dropdown labeled “Filter by Price Tier” appears in the control bar.
- When a user selects a tier (e.g., “$50.00 – Gold”):
- Seats matching that price remain fully visible and clickable.
- Seats with different prices become dimmed (transparent and greyscale) to visually recede into the background.
- Selecting “Show All” restores full visibility to all seats.
- The filter updates dynamically even if the user zooms in, pans, or changes sections.
30. Duplicating Sections with Content
Description:
Allows you to copy a Section and all of its nested children (seats, tables, decorative elements) in one action. This handles ID re-generation automatically to prevent data conflicts.
How to use:
- Open the Seating Plan Builder.
- Click on the border of a Section to select it.
- In the Inspector Panel, click the “Duplicate” button.
- A copy of the Section—containing copies of all tables, rows, and shapes inside it—will appear slightly offset from the original.
- Drag the new Section to its desired location.
Smart Data Handling:
- Unique IDs: The system automatically generates new unique IDs for every single duplicated seat and table.
- Killed/Blocked Seats: If you had marked specific seats as “Killed” or “Blocked” in the original section, those statuses are intelligently mapped to the new seats in the duplicated section, so you don’t have to re-do your configuration.
31. Seat Lock Timer (Cart & Checkout)
To prevent users from holding onto seats indefinitely without purchasing, the plugin includes an automated Seat Lock Timer. When a customer adds a specific seat or table to their cart, that seat is temporarily “locked” and cannot be purchased by anyone else.
If the customer does not complete their checkout before the timer runs out, the seats are automatically removed from their cart and made available to the public again.
How to Configure the Timer
- In your WordPress admin dashboard, navigate to Seating Plan > Settings.
- Scroll down to the Booking Logic section.
- Locate the Seat Lock Time (Minutes) setting.
- Enter the number of minutes a seat should remain locked in a user’s cart (the default is 15 minutes).
- Click Save Settings.
How it Looks to the Customer
Once a user adds a seat to their cart, a dynamic countdown timer will appear at the top of the Cart and Checkout pages.
- It displays a message like: “Time remaining to complete checkout: 14:59”
- If the timer reaches 00:00, the page will refresh, the seats will be cleared from their cart, and the user will see a notice explaining that their reservation time has expired.
32. Advanced Ticket & Email Builder
You can now design beautiful, fully responsive tickets for your events without writing a single line of code. The plugin includes a powerful Drag-and-Drop Grid Builder to customize the ticket layout for three different areas:
- The Thank You Page Ticket (Displayed immediately after checkout).
- The Order Confirmation Email (Embedded directly inside the WooCommerce email).
- The Printable Receipt (An HTML file automatically attached to the confirmation email for easy printing).
Step A: Set Your Global Content & Theme
Before building your layouts, set your branding and text.
- Go to Seating Plan > Settings.
- Scroll down to the Ticket Content & Theme section.
- Logo Image: Upload your company or event logo.
- Colors: Choose your Theme Color (used for the header block) and Background Color.
- Text Content: Fill out the custom text fields for your Main Title, Thank You page intro, Email intro, and Footer/Terms & Conditions.
Step B: Using the Drag-and-Drop Builder
Scroll down to the Drag-and-Drop Grid Layouts section. You will see three separate layout builders. Changes made to one builder do not affect the others, allowing you to design unique layouts for emails versus printed receipts.
1. Add Structure (Rows & Columns)
- On the left sidebar of the builder, click 1 Col or 2 Cols to add a new row to your canvas.
- Use 2-column rows to place elements side-by-side (e.g., Customer Info on the left, QR Code on the right).
- For the Printable Receipt Builder: You can click + Page Break. Any elements placed below a Page Break will be forced onto a new sheet of paper when the customer prints the ticket.
2. Drag and Drop Elements
- Under the “Drag Elements” sidebar, click and hold any widget (like Logo Image or QR Code).
- Drag the widget into the dashed column areas inside your rows.
- You can re-order elements inside columns by dragging them up or down.
3. Removing Elements
- To remove a specific element, click the red “X” next to the element’s name.
- To remove an entire row, click the red “X” on the dark grey Row Header.
Available Elements (Widgets)
You can drag the following elements into your layouts:
- Logo Image: Displays the logo uploaded in your Global settings.
- Main Title Box: A colored header block displaying your “Main Ticket Title”.
- Intro Text: Displays the context text (changes dynamically based on whether it is an email, thank you page, or receipt).
- QR Code & Code: The scannable QR code and alphanumeric Master Code used by the ticket scanner.
- Customer Info: Displays the attendee’s full name and their WooCommerce Order ID.
- Seat List: A formatted list of all events, seats, and tables purchased in the order.
- Separator Line: A simple visual divider (horizontal line).
- Footer / Terms: Displays your refund policies or event terms at the bottom of the ticket.
Pro-Tips for Ticket Design
- Email Layouts: Email clients (like Outlook and Gmail) can be strict. Keep email layouts simple. A single-column layout or a simple 2-column layout works best.
- Printable Receipts: Use the + Page Break tool! You can put the main Ticket and QR code on Page 1, add a Page Break, and put a large “Footer / Terms” text block on Page 2 so the scanner doesn’t have to scan a page cluttered with legal text.
- Always click Save Settings at the bottom of the page after modifying your drag-and-drop grids.
33. Seat & Table Add-ons
The Seat & Table Add-ons feature lets you offer optional WooCommerce products — such as food packages, drinks, table signage, or merchandise — to your customers at the moment they book a seat or table. This is a powerful upsell tool that increases your average order value without any friction in the booking flow.
How It Works (Customer View)
- The customer selects a seat or table on your interactive seating chart.
- They click the “Book Selected” button.
- A clean Add-ons Modal appears — showing your configured extras with images, descriptions, prices, and quantity selectors.
- The customer chooses their desired extras (or skips them entirely).
- Everything is added to the WooCommerce cart as linked line items — the seat and all chosen add-ons appear together in one clear order.
Step 1 — Create Your Add-on Products in WooCommerce
Any existing WooCommerce product can be used as an add-on. If you have not created them yet:
- Go to Products → Add New in your WordPress dashboard.
- Give the product a name — for example, “3-Course Dinner Package” or “Table Signage”.
- Set the product type to Simple product for a flat price, or Variable product if you need options (e.g. chicken or vegetarian).
- Set a Regular price.
- Optionally add a product image and short description — both will appear in the add-ons modal on the frontend.
- Click Publish.
Repeat this for each add-on you want to offer.
Step 2 — Configure Add-ons for Your Event
- Open your event in the WordPress admin (Events → Edit).
- Scroll down to the “Event Seating Settings” meta box.
- Find the “Seat Add-ons” section.
- Use the product search field to find and select the WooCommerce products you want to offer as add-ons for this event.
- For each selected product, choose the quantity mode:
- Per Seat — the suggested quantity automatically matches the number of seats the customer selected. For example, booking a table of 8 suggests a quantity of 8 dinner packages.
- Per Order — a flat quantity of 1 regardless of how many seats are booked. Best for items like table signage or a single drinks bundle.
- Optionally enter a Display Label to rename the product in the modal (e.g. rename “Package A – Dinner” to “Gala Dinner Package”).
- Click Update or Publish to save.
Step 3 — Test the Frontend Flow
- Visit your event page on the frontend.
- Select any seat or table on the seating chart.
- Click “Book Selected”.
- The add-ons modal should appear with your configured products.
- Select quantities and click “Add to Cart with Add-ons” — or click “Skip & Book” to proceed without extras.
- Check the WooCommerce cart to confirm the seat and add-ons appear as linked line items.
Cart & Order Behaviour
| Scenario | What Happens |
|---|---|
| Customer adds add-ons | Seat + add-ons appear as separate linked line items in the cart |
| Customer removes seat from cart | All linked add-ons are automatically removed too |
| Customer skips add-ons | Only the seat is added to the cart — no extras |
| Timer expires (Cart Countdown) | Seat and all linked add-ons are cleared from the cart together |
| Order is placed | Add-ons appear in the WooCommerce order, confirmation email, and Booking Manager |
Per-Event vs Global Add-ons
Add-ons are configured per event. This means you can offer a completely different set of extras for each event:
- A gala dinner event → dinner packages and wine selections
- A concert → merchandise and drinks packages
- A corporate awards night → branded signage and catering upgrades
There is no global add-on setting. Each event has full independent control.
Variable Product Add-ons
If your add-on product is a Variable product (e.g. a meal with a choice of chicken, fish, or vegetarian), a variation selector will appear inside the add-ons modal. The customer selects their variation before adding it to the cart. Each variation is treated as a separate line item in the order.
Viewing Add-ons in the Booking Manager
Add-ons purchased alongside a seat booking are visible in your Booking Manager dashboard (see section 23). Each booking row shows the associated add-ons in a linked column, so you can see at a glance which guests ordered extras — and which specific seat or table they are tied to.
Troubleshooting
Add-ons modal does not appear
- Check that at least one product is selected in the Seat Add-ons section of your event settings.
- Make sure the selected product is published and not out of stock.
- Confirm you are using the Pro version of the plugin. This feature is not available in the Lite or Starter plans.
Add-on quantity is wrong
- If set to Per Seat mode, the suggested quantity equals the number of seats in the selection. For whole-table bookings, it equals the table capacity. The customer can always manually adjust the quantity in the modal.
Add-ons not showing in the order email
- Add-on line items use standard WooCommerce order item meta. Ensure your WooCommerce email templates have not been heavily customised in a way that strips line items. Using a default WooCommerce email template will always show add-ons correctly.
A product I selected is not appearing in the modal
- The product may have been deleted or set to draft. Go to Products in your admin and confirm the product status is Published.
Notes
ℹ️ Pro Feature — Seat & Table Add-ons are available on the Pro plan only. See the plugin page for plan details.
ℹ️ The Cart Countdown Timer (section 31) works alongside add-ons. When the timer expires, both the seat and all linked add-ons are released back to the pool automatically.
34. Waitlist / Waiting List System
34.1 Overview
The Waitlist System captures customer interest when an event sells out. Customers join via a frontend form and are automatically notified by email when a seat becomes available, with a timed purchase link. Clicking the link validates the token and redirects the customer directly to the event’s seating plan page to complete their booking.
34.2 Adding the Waitlist Form to an Event Page
The waitlist form is added via shortcode. Place it in the event page content, a widget, or any page builder block:
| [les_waitlist_form event_id=”123″] Replace 123 with your actual event post ID.Find the event ID in the URL when editing the event: ?post=123 |
The form displays: a name field, an email field, and a “Notify Me” button. It handles validation, duplicate prevention, and sends a confirmation email on submission automatically.
34.3 Automatic Seat Release Notification
The system triggers automatically in three scenarios:
- Order Cancelled — when a WooCommerce order status changes to Cancelled.
- Order Refunded — when an order status changes to Refunded.
- Order Failed — when an order status changes to Failed.
In each case, les_notify_next_on_waitlist() is called for the affected event. It:
- Finds the oldest pending entry for that event.
- Generates a unique 64-character hex token.
- Sets a 30-minute expiry on the token.
- Marks the entry status as notified.
- Sends an email with the timed purchase link.
34.4 Admin: Waitlist Manager
Navigate to Seating Plan → Waitlist in your WordPress admin to see all waitlist entries.
Columns shown: Event, Name, Email, Status, Date Joined, Actions.
Actions available:
- Notify Now — manually triggers a notification email to a pending entry, regardless of whether a seat is released.
- Remove — permanently deletes the entry from the waitlist.
34.5 Settings: Waitlist Claim Page
A new setting has been added under Seating Plan Settings → Booking Logic: Waitlist Claim Page. This controls where customers land after clicking the timed purchase link in their notification email.
To configure: Go to Seating Plan → Settings → Booking Logic → Waitlist Claim Page. Select the page from the dropdown and save.
Redirect priority order:
- Auto-detect — the plugin searches all published pages for one containing [event_seating_plan] with the matching event ID. If found, the customer is redirected there.
- Configured claim page — if auto-detect finds no match, the page selected under Waitlist Claim Page in settings is used.
- Fallback — if neither of the above resolves, the customer is redirected to the event post permalink itself.
The dropdown shows “— Auto-detect from shortcode —” as the default option. In most single-event setups, auto-detect works without any configuration. Only set a specific page if your setup uses a shared booking page for multiple events.
Token behaviour on the claim URL:
- Valid token — customer is redirected to the seating plan page with ?les_wl_claim=TOKEN appended.
- Expired token — entry status is updated to expired and the customer sees a clear “Link Expired” message with a 410 response.
- Invalid or already-used token — customer sees a “Invalid Link” message with a 410 response. The link cannot be reused.
34.6 Customer Email Flow
| 1. Customer submits the waitlist form → Confirmation email sent immediately 2. A seat is released (order cancelled/refunded/failed) → Notification email sent to next in queue → Email contains a unique timed link (valid 30 mins) 3. Customer clicks the timed link → Token is validated, then customer is redirected to the event’s seating plan page to select and book their seat 4. If link expires unused → Next person in queue is notified on the next release5. Customer completes purchase → Entry status is automatically updated to purchased, token is cleared |
34.7 Troubleshooting
- Form not showing — Check the event_id in the shortcode is correct. Verify les_public_data JS variable is loaded (requires les-selector-js to be enqueued).
- No emails received — Install WP Mail SMTP and configure a sending service. WordPress default wp_mail() often fails on local/shared hosting.
- Table does not exist error — Deactivate and reactivate the plugin. If the error persists, the feature files are loading after the activation hook runs — verify the manual require_once fix in on_plugin_activate() is in place.
- Notify Now does nothing — Check there is a pending entry for that event in the database. The function only notifies the next pending entry.
- Claim link redirects to wrong page — The plugin first tries to auto-detect the page containing [event_seating_plan] with your event ID. If that fails, it falls back to the page set under Seating Plan → Settings → Booking Logic → Waitlist Claim Page. Set this to the correct page if auto-detect is not resolving properly.
Claim link shows “Invalid Link” or “Link Expired” — Invalid means the token does not exist or has already been used (status is no longer notified). Expired means more than 30 minutes passed before the customer clicked. In both cases the entry must be re-notified manually from the Waitlist Manager.
35. Seat Transfer / Ticket Swap
35.1 Overview
The Seat Transfer system allows customers to request a seat change after purchase, directly from their WooCommerce My Account page. Admins can approve or reject requests. On approval, all relevant data — the seating map, bookings table, and WooCommerce order — are updated automatically.
35.2 WordPress Rewrite Endpoint
The My Account tab requires a registered rewrite endpoint. This is registered in live-event-seating.php at init priority 1:
| add_action( ‘init’, function() { add_rewrite_endpoint( ‘les_seat_transfer’, EP_ROOT | EP_PAGES );}, 1 ); |
IMPORTANT: After any plugin update or fresh installation, go to Settings → Permalinks and click Save Changes to flush rewrite rules. Without this step, the My Account tab will return a 404.
35.3 Customer Flow
- Log in to your WordPress/WooCommerce account.
- Click “Seat Transfer” in the My Account sidebar menu.
- Select your current booking from the dropdown (shows event name, seat label, and order number).
- Use the live search field to find an available seat — type a seat label like “Table 3” or “Row B” to see matching results.
- Select the desired seat from the search suggestions.
- Optionally add a reason for the transfer.
- Click Submit Transfer Request.
- A confirmation message appears and an admin notification email is sent.
35.4 Admin Approval Flow
- Navigate to Seating Plan → Seat Transfers.
- Review the request: order, event, customer, from-seat, to-seat, reason.
- Click Approve or Reject.
On Approval, the system automatically:
- Updates the seat_id in the wp_les_bookings table.
- Swaps the booking key in the event’s _seating_plan_data layout JSON (releases old seat, books new seat).
- Updates _les_seat_ids array meta on the WooCommerce order item.
- Updates the human-readable “Seat / Table” display meta on the order item.
- Adds a “Seat Transfer” note to the order item for audit trail.
- Adds a WooCommerce order note visible in the admin order screen.
- Sends a confirmation email to the customer with old and new seat details.
On Rejection, the system sends a rejection notification email to the customer.
35.5 Live Seat Search (Large Venues)
For venues with many seats, the new seat selection uses a live search with debouncing rather than a dropdown:
- Customer types 2+ characters to trigger search.
- AJAX call fires after 300ms debounce to avoid excessive requests.
- Returns up to 20 matching available seats per query.
- Results appear as a clickable suggestion list below the input.
- Selecting a result stores the raw seat ID in a hidden field for form submission.
- The customer must select from the list — free-text submission is blocked by validation.
35.6 Troubleshooting
- 404 on My Account → Seat Transfer — Go to Settings → Permalinks → Save Changes. If still 404, confirm add_rewrite_endpoint is in live-event-seating.php at init priority 1, not inside the features file.
- No bookings showing in dropdown — The system reads from wp_les_bookings table. Confirm the customer has completed orders with LES seat bookings.
- Seat search returns no results — The search scans the event layout. Confirm the event_id is correct and the layout has available (non-booked, non-killed, non-blocked) seats.
- Approval not updating WooCommerce order — Check that les_execute_seat_transfer() is running without errors. Enable WP_DEBUG_LOG and check for PHP errors on approval.
36. Group / Bulk Booking with Auto Seat Picker
36.1 Overview
The Group Booking feature adds an intelligent toolbar above the seating chart that allows customers to auto-select a block of adjacent seats by entering a quantity. It uses a server-side scan algorithm to find the best available consecutive seats and highlights them on the interactive map.
36.2 How the Toolbar Works
The toolbar is injected automatically via the wp_footer hook on any page containing the [event_seating_plan] shortcode. It appears above the seating chart canvas and contains:
- A label: “Group Booking:”
- A number input for the desired quantity.
- A “Find Best Seats” button.
- A “Clear” button (visible after a successful selection).
- A status message area.
36.3 The Seat Selection Algorithm
When the customer clicks “Find Best Seats”, an AJAX request is sent to les_find_best_seats with the event_id and quantity. The server-side algorithm:
- Loads the event layout JSON from post meta.
- Builds a list of all soft-locked seat IDs (currently in other customers’ carts via transients).
- Iterates through every layout element in order.
- For seat blocks: scans row by row, seat by seat, looking for a consecutive run of N available seats.
- For tables: scans seats sequentially looking for a consecutive run.
- Skips: killed seats, blocked seats, already-booked seats, soft-locked seats.
- Returns the first qualifying run of exactly N seat IDs.
If no block of N consecutive seats is found, an error message is returned suggesting the customer try a smaller group or select manually.
| ♿ What Is It?Accessibility Seat Marking lets you flag individual seats as Wheelchair Accessible or Companion Seat directly from the admin builder. These seats appear visually distinct on the booking map and customers can filter to show only accessible seating with a single click. |
37. Wheelchair / Accessibility Seat Marking
Accessibility is increasingly a legal requirement across many jurisdictions — including ADA compliance in the United States, the Equality Act in the United Kingdom, and equivalent legislation across the EU and elsewhere. Beyond legal compliance, making accessible seating clearly visible and easy to find is simply good practice for any event organiser who wants all attendees to feel welcome.
Live Event Seating makes accessibility marking a first-class feature of the booking flow — not an afterthought.
Seat Types
| Type | Description & Visual |
| ♿ Wheelchair | A wide bay designed for wheelchair users. Rendered in solid blue (#1A73E8) with a ♿ icon overlay on the seat circle. Cannot be booked by ambulatory customers when the accessible filter is active. |
| �� Companion | A standard seat placed directly adjacent to a wheelchair bay, reserved for a carer or companion. Rendered in light blue (#64B5F6). Visible in the accessible filter view alongside its paired wheelchair bay. |
How to Mark Accessible Seats in the Builder
- Open your event in the WordPress admin and click Edit Seating Plan.
- In the builder toolbar, click the ♿ Mark Accessible button. The button turns blue to indicate you are now in accessibility marking mode.
- Click any seat in the plan to cycle through its accessibility state:
- First click: Standard → ♿ Wheelchair (seat turns solid blue with ♿ icon)
- Second click: ♿ Wheelchair → �� Companion (seat turns light blue)
- Third click: �� Companion → Standard (seat returns to its original colour)
- Mark all required accessible seats and companion seats. The layout saves automatically after each click.
- Click the ♿ Mark Accessible button again to exit accessibility mode and return to the normal selection mode.
Frontend Booking Experience
On the public booking page, accessibility seats are automatically visually distinct — wheelchair bays appear in solid blue with a ♿ icon, and companion seats in light blue. All other seats remain at their configured colours.
A ♿ Show Accessible Seats Only filter toggle is automatically injected below the map controls whenever the event has at least one marked accessible seat. When the customer activates the filter:
- All non-accessible seat sections fade to 12% opacity and cannot be clicked.
- Only wheelchair and companion seats remain fully interactive.
- The filter is a simple checkbox toggle — clicking again restores the full map view.
Seat tooltips on hover also display the accessibility type as a blue badge — ‘Wheelchair Accessible’ or ‘Companion Seat’ — so the distinction is always clear without requiring the filter to be active.
Where Accessibility Info Appears
- Seat tooltip: badge shown on hover for accessible/companion seats.
- Cart: an ‘Accessibility’ line item is added to the WooCommerce cart for any accessible seat.
- Checkout: shown in the order summary during checkout.
- Order confirmation / My Account: displayed in the order details table.
- Confirmation email: included in the seat list within the WooCommerce order email.
- PDF ticket: shown next to the seat name on the generated ticket.
- Booking Manager: a dedicated ♿ Accessible column in the admin table.
- CSV export: an ‘Accessible’ column (Wheelchair / Companion / blank) in exported reports.
38. Guest Name Assignment
| What Is It? Guest Name Assignment lets event organisers pre-assign a named guest to every individual seat — just like a place-card system. Guest names appear on the ticket, in the Booking Manager, and in the CSV export. When the admin setting is enabled, customers can also enter and update names from their own My Account dashboard. |
The Problem It Solves
At galas, weddings, and formal corporate dinners, organizers need a ‘Table 3, Seat 2 = John Smith’ system. Previously, the only way to do this was to dig through individual WooCommerce orders one by one and manually add notes — time-consuming, error-prone, and invisible to customers.
Guest Name Assignment gives you a dedicated admin tool to manage all seat assignments in one view, with inline editing, bulk import, and automatic propagation to tickets and reports.
Admin: Assigning Guest Names
Method 1 — Booking Manager Inline Edit
- Go to Seating Plan → Booking Manager in the WordPress admin.
- Find the booking you want to assign. The Guest Name column shows ‘Unassigned’ for any seat without a name.
- Click the ‘Unassigned’ cell (or the existing name). An inline text field appears.
- Type the guest’s full name and press Enter or click Save.
- The name saves instantly via AJAX — no page reload required. A green ✓ confirmation appears.
Method 2 — Guest List Page
- Go to Seating Plan → Guest List in the WordPress admin.
- Select the event from the dropdown. All bookings for that event are shown in a table.
- Click any seat’s Guest Name cell to edit it inline, exactly as in the Booking Manager.
- Use the �� Print Guest List button to generate a clean printable roster for your front-of-house team.
Method 3 — Bulk Import
- From the Guest List page, click ⬆ Bulk Import Names.
- In the modal that appears, paste your assignments in the format:
| Booking ID, Guest Name42, John Smith43, Jane Doe44, Robert Johnson |
- Click Import. All names are saved in one AJAX call and the page reloads to confirm.
Tip: The Booking ID for each seat is shown in the Booking Manager table and Guest List table.
Customer Self-Service Guest Name Entry
When enabled by the admin, customers can enter and update guest names for their own bookings from My Account → Orders → View Order, without needing to contact the organiser.
| ⚙️ Admin Setting RequiredThis feature is off by default. To enable it, go to Seating Plan → Settings → Guest Name Assignment and tick Allow Customer Guest Name Entry. Save settings. |
When the setting is enabled, a ‘Guest Name Assignment’ table appears at the bottom of the customer’s order view page. It lists each booked seat with its current guest name. Customers can:
- Click any seat row to open an inline text editor.
- Type or update the guest name and press Enter or click Save.
- The name saves instantly and the PDF ticket is automatically regenerated so the next download reflects the updated name.
Where Guest Names Appear
| Location | How it appears |
| Ticket (Thank You Page) | Purple badge with the guest name shown inline after the seat label. |
| Ticket (My Account View Order) | Same purple badge — always reflects the latest saved name. |
| PDF Ticket (Email Attachment) | Guest name shown in italic after an em-dash next to the seat label. Auto-regenerates when name is updated. |
| WooCommerce Confirmation Email | Included in the seat list in the order email body. |
| Booking Manager | Dedicated Guest Name column, inline-editable without leaving the page. |
| Guest List Page | Full event roster showing every seat, its guest name, booking customer, order link, and check-in status. |
| CSV Export | Guest Name column included in all exported booking reports. |
| Print Guest Roster | Clean printable table of all seats and names for front-of-house use. |
.
39. Multi-Date Events
📅 What Is It?
Multi-Date Events lets you define an event that spans across several days—such as a 3-day conference, a weekend festival, or a multi-part workshop. When a customer books a seat, they are booking that seat for the entire duration of the event. One ticket, one seat, all dates.
The Problem It Solves
Some events don’t just happen on a single evening; they take place over an entire weekend or across several specific dates. Previously, organizers struggled to cleanly communicate these complex schedules to attendees on their tickets and event pages.
Live Event Seating solves this by letting you add a complete schedule of dates to a single event. The customer buys their seat once, and the system automatically ensures their PDF ticket and order details reflect the full multi-day itinerary.
How to Use It — Step by Step
- Open your event in the WordPress admin and scroll to the Live Event Seating metabox.
- In the Event Dates section, click Add Date and enter the date, start time, and optionally an end time and a per-date label (e.g. “Day 1: Opening Ceremony”, “Day 2: Main Workshops”).
- Repeat for each additional date the event spans.
- Click Update / Publish to save.
- On the frontend, the event information will now clearly display the full multi-date schedule.
- The customer simply selects their seat from the map. By booking it, they reserve that seat for every date listed.
How It Works Technically
The multiple dates are stored as a structured array in the event post meta key _les_event_dates. Because a seat booking applies to the entire event, the core seating engine remains perfectly streamlined.
Seat locks (les_seat_lock_{seat_id}) and final bookings are tied directly to the Event ID, just like a standard event. The multi-date data is utilized by the display engine—ensuring that the WooCommerce cart, order emails, PDF tickets, and check-in screens accurately output the complete schedule of the event rather than just a single timestamp.
Frontend Behaviour
- Instead of showing a single date and time, the event page displays the full schedule/itinerary of dates to the customer.
- Customers do not select a specific day from a dropdown; they simply select their seat from the map, knowing it is theirs for the whole multi-date event.
- The WooCommerce cart and checkout dynamically list the multi-date schedule so the attendee is completely clear on what their ticket includes.
Admin Tips
💡 Pro Tip — Date Labels
Give each date a short, descriptive label such as “Friday: Welcome Dinner” or “Saturday: Main Conference”. These labels act as a built-in mini-itinerary that appears on the customer’s printable ticket.
⚠️ Important — Seat Availability
Remember that availability is tied to the event as a whole. If a customer buys Seat B5, it is completely blocked off for the entire multi-day run. You cannot sell Seat B5 to a different customer for Day 2. If you need to sell different days to different people, you should create separate standard events instead of a Multi-Date event.
40. Manual Order Management (Walk-in / Offline Bookings)
The Manual Order page lets any admin or shop manager create a complete, fully-tracked booking for a customer without using the public checkout flow. It is designed for walk-in customers, phone bookings, staff reservations, and complimentary tickets.
Every manual booking creates a real WooCommerce order — so revenue, analytics, and the Booking Manager all stay accurate automatically.
How to Access
Navigate to Seating Plan → Manual Order in your WordPress admin sidebar.
Step-by-Step: Creating a Manual Order
Step 1 — Select the Event
- On the Manual Order page, use the “Select Event” dropdown to choose the event you want to book.
- Click “Load Event”. The event’s details (date, time, venue) will appear, and the live seating map will load below.
Step 2 — Select Seats or a GA Area
The full interactive seating map appears on this page — the same map your frontend customers see, with real-time availability.
For seated events (individual seats / tables):
- Pan and zoom the map to find the right area.
- For section-based (multi-section) layouts, the map starts in overview mode showing all sections. Click any section to zoom in and see the individual seats inside it. Use the back arrow button to return to the overview.
- Click any green (available) seat to select it. It turns amber to confirm selection.
- For Whole Table Booking tables, click the table shape to select all seats on it at once.
- Selected seats appear in the “Selected Seats” panel on the right, showing the section name, table or block name, and seat number (e.g., Section A › Round Table 3 — Seat 4).
- To deselect a seat, click it again on the map, or click the × (remove) button next to it in the selected seats panel.
For General Admission areas:
- Click the GA area on the map. A quantity selector appears in the panel.
- Enter the number of tickets required. The system will check remaining capacity and warn you if you exceed it.
Step 3 — Fill in Customer Details
In the “Order Details” panel, complete the following fields:
| Field | Required | Notes |
|---|---|---|
| Customer Name | ✅ Yes | Full name of the attendee |
| Customer Email | Optional | Required if sending a confirmation email |
| Amount | Optional | The price collected offline. Leave at £0 for complimentary tickets |
| Complimentary | Optional | Toggle this on to mark the booking as free. Overrides the amount field |
| Internal Notes | Optional | Staff note stored on the order (e.g., “Cash paid – approved by manager”) |
| Send Confirmation Email | Optional | If checked, sends a ticket email to the customer’s email address |
Step 4 — Confirm the Order
Click the “Create Order” button.
The plugin will:
- Lock the selected seats (or deduct GA quantity) against the event immediately.
- Create a real WooCommerce order with the correct line items and amount.
- Generate a unique QR ticket code (format:
LESM-{timestamp}-{random}) compatible with the Ticket Scanner. - Store all booking rows in the
les_bookingsdatabase table — identical to online bookings. - Send a ticket confirmation email to the customer (if the option was checked), containing their seat list, event details, ticket code, and QR code image.
The Confirmation Panel
After the order is created, a confirmation panel is shown with:
- Ticket Code — the unique reference for this booking (e.g.,
LESM-1748942301-57423). - QR Code — the scannable image for door check-in.
- Print Ticket button — opens a clean, print-ready ticket containing only the ticket details (no admin interface). Use this to hand a physical copy to a walk-in customer.
- Create Another Order button — resets the form to start a new booking immediately.
Viewing Manual Orders After Creation
Because a real WooCommerce order is created, you can find and manage the booking in all the usual places:
- WooCommerce → Orders — the order appears here with a note marking it as a manual booking.
- Seating Plan → Booking Manager — the seat rows appear in the booking list with the customer name, email, check-in status, and order reference.
- Analytics Dashboard — the order amount is counted in total revenue, seat sales, and the per-event revenue table.
- CSV Export — manual bookings are included in all exported reports.
Cancelling or Editing a Manual Order
To cancel a manual order:
- Go to WooCommerce → Orders and find the order.
- Change the order status to Cancelled or Refunded.
- The plugin will automatically release the locked seats back to the live seating map — exactly the same as cancelling an online order.
To change which seats are booked, cancel the original order (to release the seats) and create a new manual order with the correct selection.
Checking In a Manual Order Attendee
Manual order QR codes work exactly like online order codes. At the event:
- QR Scanner: Navigate to Events → Ticket Scanner. Point the camera at the QR code on the customer’s phone or printout. The scanner will confirm check-in or warn if the code has already been used.
- Manual entry: Type the ticket code (e.g.,
LESM-1748942301-57423) into the manual entry field on the scanner page. - Booking Manager: Find the booking in Seating Plan → Booking Manager and click the check-in toggle directly in the list.
Permissions
The Manual Order page is only visible to users with the manage_woocommerce capability (Administrator and Shop Manager roles by default). Regular editors and subscribers cannot access it.
Notes & Tips
- Complimentary tickets create a £0 WooCommerce order. They appear in the Booking Manager and are scannable at the door — only the revenue is zero.
- The Internal Notes field is for staff use only and does not appear on the customer’s ticket or email.
- If you need to book seats across multiple GA areas in a single transaction, create separate manual orders for each area.
- For section-based layouts, you can book seats from multiple sections in a single order — just zoom into each section and select seats before clicking “Create Order.”
- The Print Ticket button uses an isolated print window — only the ticket prints, not the WordPress admin page.
41. Frequently Asked Questions (FAQ)
- Q: Can I reuse a layout for multiple events?
- A: Yes! Use the “Export Layout” and “Import Layout” buttons in the builder to create reusable templates.
- Q: Why isn’t the QR code working?
- A: Your server most likely needs the PHP GD Graphics Library enabled. Please contact your web host and ask them to enable the gd extension for PHP.
- Q: How do I offer VIP and Standard pricing?
- A: You must use a WooCommerce “Variable Product”. Please see the detailed guide in section 4 above.
Ready to Get Started?
This documentation covers every feature of the Live Event Seating Pro plugin. If you have not purchased yet, try the interactive demo or view all plans.
Ready to Keep 100% of Your Ticket Sales?
The Live Event Seating Plugin integrates with WooCommerce, giving you a powerful seating chart builder with zero per-ticket fees.